Ingredients:
- black, edible glitter flakes
- brulee torch or other mini-torch
- (this makes enough to cover the whole volcano. make immediately before using)
- lots of fluff (3-4 cups should be enough)
Directions:
- Instructions
- 1. Bake three layers of the cake and one batch of chocolate glaze according to the recipes below. Allow the cakes to cool completely.
- 2. Place the largest cake layer on the cake board using a thin layer of Fluff to anchor the cake to the board. (Keep the Fluff toward the center so the outside of the cake remains brown.)
- 3. Fluff the bottom of the next layer and center it upon the lower layer. Continue for all layers.
- 4. With a sharp, serrated knife, trim the layers to shape the cake into a cone (see figure). Set aside the trimmed pieces.
- 5. If you need to expand the center hole to fit your glass, use a long, thin knife, to widen the diameter to just slightly larger than the glass. Use a long spoon to remove cake from the hole. The hole should be as deep as the glass is tall. Insert the glass.
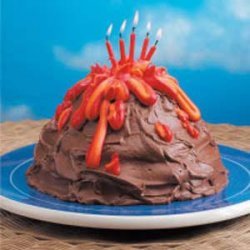
- 6. Prepare the Chocolate Glaze. Pour the glaze over the top and down the sides. Using a spatula or large, flat knife, spread the chocolate glaze so that it is evenly and smoothly distributed on the top and over the sides. It is fine if the glaze does not completely cover the sides of the cake. Press black glitter into glaze, creating a pattern to resemble dirt and rock. Let cool completely.
- 7. Insert the glass container into the magma chamber and add Fluff around the top rim so that the magma cannot flow back into the cake.
- 8. Frost the upper two-thirds of the sides and all of the flat top of the volcano with Fluff. Use the spreading knife to leave swirls and ridges that mostly run vertically. Allow some globs to run down the mountain. Use the brulee torch to lightly brown the ridges of Fluff. The result should look like a snow capped mountain with brown ridges adding depth and representing rocky cliffs above the snow line. Add plastic or edible trees on the lower slopes of the mountain.
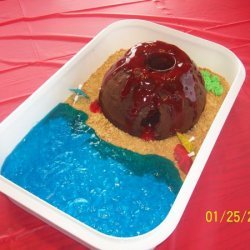
- 9. If you wish to continue the decorations onto the cake board, cover it first with a half-inch layer of Fluff topped with finely crumbled graham crackers. Press the graham crackers lightly into the Fluff to minimize subsequent movement. Add decorations of dinosaurs, Hawaiian islanders, rescue workers in fire-retardant suits, etc. by gently sticking them into the under-layer of Fluff.
- The Eruption:
- About two minutes before you wish to present the eruption, drop some dry ice, about the volume of two or three ice cubes, into the glass magna chamber. This will start some smoke effects while you prepare the rest of the magma.
- Prepare and then pour the Fluff lava, now in a hot, colored, liquid form (see below), into the magma chamber. If your magma has cooled, add an ounce or two of very hot (not boiling) water. A smoking, bubbling, yummy foam will erupt and flow down over the volcano for about 5 minutes.
- Serve and enjoy!
- Chocolate Tube-cake Recipe:
- Preheat oven to 350F. Grease an angel-food cake pan or other tube pan.
- In a food processor, pulse almonds until finely ground.
- In a double boiler or in a bowl set over a sauce pan of simmering water, melt chocolate, stirring until smooth. Remove top of double boiler or bowl from heat and allow chocolate slightly to cool.
- In a large bowl with an electric mixer, beat butter with 1/2 cup sugar until light and fluffy. (I allow the butter and sugar to beat for at least 3-4 minutes.) Add the melted chocolate and beat until incorporated into the butter-sugar. One at a time, add the 8 egg yolks, making sure to beat well between each yolk. Stir in ground almonds and flour.
- In another bowl with cleaned beaters, beat egg whites and Fluff until thoroughly combined and whites hold soft (though not stiff), slightly glossy peaks.
- Stir one fourth of egg white-Fluff mixture into chocolate mixtures to lighten the batter and then fold in remaining whites until no streaks remain.
- Pour batter into pan and smooth top. Bake cake in middle of the oven for 35-45 minutes or until tester comes out mostly clean. It is important not to overcook the cake because overcooking will cause the cake to be too dry.
- When the cake is done, invert the cake onto a rack. After five minutes, remove the pan, but leave the cake and allow it completely to cool.
- Repeat 2 more times for a total of three chocolate hazelnut cakes. (Yes, this does take a lot of time and a lot of eggs!)
- Chocolate Glaze Recipe
- Prepare, cool, stack, and shape the cakes first!
- In a double boiler or in a bowl set over a sauce pan of simmering water, melt chocolate and butter, stirring until smooth. Immediately apply to the cake.
- Fluff Lava Recipe:
- Place 2 C Fluff, thinned slightly, with 1-2 Tbs hot water. Stir well and add food coloring.
- Pour Fluff onto the dry ice in the magma chamber while still hot.
- Add 1 Tb hot water.
- Serving Suggestions
- - Serve a la mode with Toscanini’s Fluff ice-cream.
- - Minimize the mess with a smoking, non-erupting volcano – just pour 1-2 oz. of hot water onto the dry ice in the magma chamber and don’t add any Fluff lava.
- - Add a beach to the cake board decorations. Use Fluff, colored blue, for the ocean.
- - Use crumbled Oreo cookies (with or without the creamy filling!) as an alternative to the graham crumbs.
- - Add a ski lift and skiers to the mountainside with a lodge at the bottom.
- - Select pine trees or palm trees to match your party theme.
- Tips and Hints
- If your glass jar (the magma chamber) is not as tall as your layered cake, just make the hole in the cake less deep or toss some of the trimmed cake chunks into the hole to raise the glass so that its rim is near the top of the cake.
- When spreading Fluff it may help to use a large flat knife dipped in warm water.
- Use a small diameter pan or container when making the Fluff magma to make it easier to pour into the magma chamber.
- To dispose of extra dry ice, just leave it in an open container until completely sublimated. Do not put in refrigerator, freezer, or down the drain of a sink or a toilet. Do not place it in a container or on a surface that could be damaged by extreme cold.
- If you want to restart the lava a second (or third…) time, use a long spoon to remove lava residue from the glass, drop in some fresh dry ice and more of the hot, liquid lava. Try using different colors, such as yellow or red, for the subsequent eruptions.
- It’s not easy to build a cone shaped cake. Just keep in mind that you want the top to remain larger than the glass container that will be inserted, so don’t trim too much. If you’re going to have some horizontal areas showing because an upper layer is significantly smaller than a lower layer, consider placing the upper layer(s) off-center of the lower layer(s); one “side” of the volcano can be a smoothly angled drop-off while other sides can have terraces. Plant farms on the terraces!
- If you want the lava to flow in a specific direction, then shape the top of the cake (before icing it) so that it is lower toward the desired direction of the flow.
- If presenting at a party you can make a village around the base and people out of gingerbread, makes for a great affect.
Nutrition Facts
| Amount Per 1 Serving | |||
| Calories | 744.78 Kcal (3118 kJ) | ||
| Calories from fat | 343.63 Kcal | ||
| % Daily Value* | |||
| Total Fat | 38.18g | 59% | |
|---|---|---|---|
| Cholesterol | 147.56mg | 49% | |
| Sodium | 413.98mg | 17% | |
| Potassium | 225mg | 5% | |
| Total Carbs | 92.64g | 31% | |
| Sugars | 18.56g | 74% | |
| Dietary Fiber | 3.38g | 14% | |
| Protein | 10.39g | 21% | |
| Vitamin A | 0.2mg | 6% | |
| Iron | 3.4mg | 19% | |
| Calcium | 105.1mg | 11% | |
| Amount Per 100 g | |||
| Calories | 361.94 Kcal (1515 kJ) | ||
| Calories from fat | 166.99 Kcal | ||
| % Daily Value* | |||
| Total Fat | 18.55g | 59% | |
|---|---|---|---|
| Cholesterol | 71.71mg | 49% | |
| Sodium | 201.18mg | 17% | |
| Potassium | 109.34mg | 5% | |
| Total Carbs | 45.02g | 31% | |
| Sugars | 9.02g | 74% | |
| Dietary Fiber | 1.64g | 14% | |
| Protein | 5.05g | 21% | |
| Vitamin A | 0.1mg | 6% | |
| Iron | 1.6mg | 19% | |
| Calcium | 51.1mg | 11% | |
* Percent Daily Values are based on a 2000 calorie diet. Your daily values may be higher or lower depending on your calorie needs.
Find out how many calories should you eat.
Get Your Recipe of Health!
Follow RecipeOfHealth on Facebook!

