Chocolate Swan, Treasure Chest, Picture Frame, Chocolate Sleigh, and Dressy Chocolate Box (Jacques Torres) Recipe
Posted by

Directions:
- To mold the swan: Use a ladle to fill a mold with white chocolate. When it is full, empty it into the bowl of chocolate. The inside of the mold should be evenly coated with chocolate. Wipe the edge of the mold clean on the side of the bowl and place it upside down on a wire rack placed over a baking sheet. Once the chocolate starts to harden, about 5 minutes, scrape the edge clean with a paring knife. When the chocolate sets, it shrinks or retracts from the sides of the mold. A clean edge will keep it from sticking and cracking as it shrinks. You can place the mold in the refrigerator for several minutes to help the chocolate to harden. Depending on the thickness of the chocolate, you may want to repeat this step to make the swan thicker. Unmold the chocolate swan. When the chocolate has completely set, the swans are ready to fill with candy.
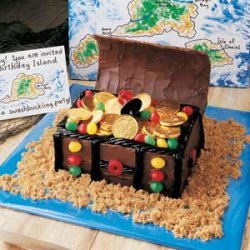
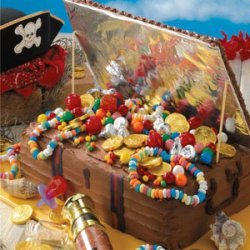
- To mold the treasure chest: Use a clean paintbrush or pastry brush to apply dark chocolate to the inside details of the mold. I painted the hinges and fasteners dark chocolate. Use a ladle to fill a mold with milk chocolate. Use the same molding technique as used in the swan. You can fill the chest with candy or any special treat. Tie it closed with a ribbon.
- To make the picture and frame: This technique can be used to make any painted design. I downloaded a clipart image from the internet. A simple design with a lot of color makes the best result.
- Place your design underneath a piece of acetate. Mix together a few tablespoons of the cocoa butter with a small amount of powdered food color. It will be easier if you use a yogurt machine to store and warm your paints. Use a fine-tipped paintbrush to trace the outline of the painting with a dark-colored paint. Use other paint colors to fill in the design. This will certainly remind you of paint-by-number. Use and airbrush if you want to give it an antique finish. Allow the paint to dry.
- Pour some white chocolate at the edge of the painted acetate. Pull the raplette through the chocolate pulling the chocolate over the painted drawing. This will spread an even 1/8-inch thick layer of chocolate over the painting. When the chocolate begins to set, use a sharp paring knife to cut the paint canvas to the finished size of the painting. Let this cool until the chocolate sets. When the chocolate has set completely, simply peel off the acetate.
- Use a brush dipped in dark chocolate to brush a very light layer of dark chocolate over the relief of the picture frame mold. Use a ladle or cornet filled with white chocolate to fill the mold with white chocolate. When the chocolate sets, unmold the picture frame. The dark chocolate will leave an antique effect. Use tempered white chocolate to glue the chocolate canvas into the frame. It is ready for display.
- Make the sleigh: Make a template for the sleigh skis and the sleigh bottom. You can make this any size that you like. The bottom of my sleigh measured 11 inches wide by 17 inches long. I used a wood grain tool normally used in house painting to give the sleigh the texture of wood.
- To make the wood grain chocolate, pour a little dark chocolate at the edge of a piece of parchment paper that measures at least 11 inches wide by 17 inches long. Use a back and forth rocking motion as you pull the wood grain tool through dark chocolate. Be sure to spread this chocolate all the way to the edge of the paper. Repeat the process until the paper is completely filled with the pattern. Repeat on more parchment to create enough wood grain pattern for all of the pieces in your sleigh.
- Use an offset spatula to spread a 1/4-inch-thick layer of tempered milk chocolate over all of the pieces that have the dark chocolate wood grain pattern. When cutting out the skis, use a paring knife to cut through the chocolate while tracing around the template. When the chocolate has set completely, remove the excess chocolate. When the chocolate is set, peel off the parchment.
- Make the sleigh handle: Roll parchment paper into a tight roll that is about 1/2-inch in diameter. Use a cornet filled with milk chocolate to fill the roll. Be sure to pinch the bottom to keep the chocolate from escaping. Set aside until the roll has set. When the chocolate is hard, remove the parchment paper. Use a hot knife to cut the sleigh handle to the size that will fit onto your sleigh.
- Assemble: Lay a ski pattern-side down on the work surface. Place tempered milk chocolate in a large cornet and trim the tip. Draw a line of chocolate along the edge of the sleigh bottom. Position the sleigh bottom onto the ski. Draw a line of chocolate on the other edge of the sleigh and position the other ski on top. When the chocolate sets, stand the sleigh upright. Use tempered milk chocolate to glue the sleigh handle into place. The sleigh is ready for any display.
- Make the Dressy Gift box: To make the strips on the top, you can use a tiling spatula with square teeth cut from it. My box measured 7 inches wide by 10 inches long. Use an offset spatula to spread a 1/8-inch-thick layer of tempered milk chocolate over a sheet of acetate. Pull the slotted spatula through the chocolate along the longest side. This will leave long straight lines. When the chocolate begins to set, use an offset spatula to spread a 1/8-inch-thick layer of tempered white chocolate over strips, being careful not to press into the milk chocolate strips. Let the chocolate set completely.
- To make the base, use an offset spatula to spread a 1/4-inch-thick layer of tempered dark chocolate over a sheet of parchment paper. Use a paring knife to cut a rectangle that measures 7 inches wide by 10 inches. Then cut 2 strips that measure 61/2 inches long and 1 1/2 inches wide. Cut 2 more strips that measure 91/2 inches long and 11/2 inches wide. When the chocolate has set completely, remove the base and strips. Use tempered chocolate to glue the strips onto the base to form a box. Place the strips just inside the edge of the base.
- Make the box decorations: Use white modeling chocolate to make the tie, collar, pocket and pocket square. I colored some modeling chocolate red for the pocket square. Get creative and have fun. Dust the work surface with cornstarch. Use a rolling pin to roll out the white modeling chocolate until it is about 1/8-inch thick. Use a paring knife to cut out the details of the shirt or blouse. Place the pieces on top of the striped chocolate box top. If you are inspired to do so, paint some patterns on the tie.
- When the chocolate has set completely on all of the pieces, the box is ready to be filled with any treat. Simply fill the box and cover with the top piece.
- SOURCES:
- Chocolate Melter: Demarle New Jersey,
- Chocolate Cold Spray: PCB in France 011 33 0388 587333
- Swan mold: Tomric Plastics
- Treasure chest mold: Tomric Plastics
- Wood grain tool: hardware/paint store
- Grout spatula for tiling: hardware
- Modeling chocolate: Beryls
Nutrition Facts
| Amount Per 1 Serving | |||
| Calories | 22788.38 Kcal (95410 kJ) | ||
| Calories from fat | 10162.94 Kcal | ||
| % Daily Value* | |||
| Total Fat | 1129.22g | 1737% | |
|---|---|---|---|
| Cholesterol | 1188.17mg | 396% | |
| Sodium | 5287.81mg | 220% | |
| Potassium | 11745.65mg | 250% | |
| Total Carbs | 3079.27g | 1026% | |
| Sugars | 2734.61g | 10938% | |
| Dietary Fiber | 45.35g | 181% | |
| Protein | 312.92g | 626% | |
| Vitamin C | 22.7mg | 38% | |
| Iron | 22.7mg | 126% | |
| Calcium | 9283.1mg | 928% | |
| Amount Per 100 g | |||
| Calories | 279.17 Kcal (1169 kJ) | ||
| Calories from fat | 124.5 Kcal | ||
| % Daily Value* | |||
| Total Fat | 13.83g | 1737% | |
|---|---|---|---|
| Cholesterol | 14.56mg | 396% | |
| Sodium | 64.78mg | 220% | |
| Potassium | 143.89mg | 250% | |
| Total Carbs | 37.72g | 1026% | |
| Sugars | 33.5g | 10938% | |
| Dietary Fiber | 0.56g | 181% | |
| Protein | 3.83g | 626% | |
| Vitamin C | 0.3mg | 38% | |
| Iron | 0.3mg | 126% | |
| Calcium | 113.7mg | 928% | |
* Percent Daily Values are based on a 2000 calorie diet. Your daily values may be higher or lower depending on your calorie needs.
Find out how many calories should you eat.
Try this similar recipes
-

Hot Chocolate Passion
White chocolate, chopped, Bittersweet chocolate, chopped and 10 more.. -
Hot Chocolate Passion Dessert
White chocolate, chopped, Bittersweet chocolate, chopped and 10 more.. -

Molded Chocolate Bunny
Cocoa butter (optional), Bittersweet chocolate , tempered -
Modeling Chocolate
Bittersweet chocolate, chopped (200 g) and 7 more.. -
Lemon Chocolate Bark
Bittersweet chocolate, chopped, White chocolate, chopped and 4 more.. -
The Ultimate Valentine Cake
Imported white chocolate (such as lindt or tobler), chopp... and 19 more.. -
Triple Chocolate Peanut Butter Truffles
Chopped white chocolate (6 oz) and 5 more..
Also Try
-

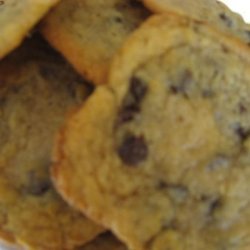
Chocolate Chip Cookies Adapted from Jacques Torres
Minus 2 tbsp cake flour (8 1/2 oz by weight) and 12 more.. -
-
-
-
-

-
-
Chocolate Chip Treasure Cookies
Graham cracker crumbs, All-purpose flour, Baking powder and 5 more.. -
-
Get Your Recipe of Health!
Follow RecipeOfHealth on Facebook!
