
Ingredients:
- generous pinch of sugar
- 2 to 4 handfuls fresh veggies such as sliced tomatoes , arugula/rocket , sorrel , shaved zucchini/courgette , kale , swiss chard , corn , or mushrooms
- handful of fresh herbs , such as basil, opal basil
Directions:
- Make the dough: Whisk a pinch of sugar into the warm water in a small bowl and sprinkle the yeast over the top {yeast feeds on sugar so this helps to wake it up and get it going}.
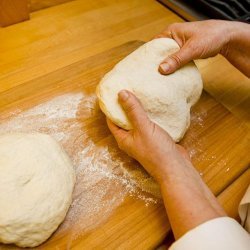
- Stir 3 cups/385 g of the flours and salt together in a large bowl or the bowl of a stand mixer to combine {reserving 1/4 cup/30 g flour for later}. Make a well in the center and pour in the yeast mixture. Stir with a fork or the dough hook to make a shaggy dough. If making the dough by hand, stir vigorously with a wooden spoon to work the gluten for about 5 minutes until the dough is smooth. Then turn onto a lightly floured countertop and knead until the dough is smooth and elastic, about 5 minutes, adding small sprinkles of flour as needed to just keep it from sticking. If you're using a stand mixer fitted with the dough hook, beat on high speed until the dough comes together and slaps the side of the bowl, about 5 minutes, adding up to 1/4 cup/30 grams more flour as needed to create a cohesive ball.
- Divide the dough half {for large pizzas} or quarters {for small pizzas} and form into balls. Place each ball of dough in a lightly oiled plastic bag, seal, and refrigerate overnight {it gets more supple as it sits overnight} or up to 3 days {or freeze for up to 1 week}.
- Remove the dough from the fridge 2 hours before you plan to cook. Oil two or four bowls {depending on whether you are making two large or four individual pizzas}. Turn each dough ball in the bowl to coat in oil; cover the bowl tightly with plastic wrap/cling film. Draw a circle around the top to mark where the dough is now, so you can watch it expand. Set aside in a warm place until doubled, about 2 hours.
- Position a pizza stone on the bottom rack of your oven. Preheat the oven to 475°F/240°C/gas 9 at least 45 minutes before you plan to bake the pizzas.
- Lightly dust a clean countertop and the dough with flour. Press and pat each ball of dough into a rectangle or round. Once you have the basic shape you want, stretch the dough by draping it over the back of your hands and wrists, letting it hang down so gravity does the work. For larger pizzas, aim for a 7-by-12-inch/17-by 30.5-cm rectangle or a 12-inch/30.5-cm round; for individual pizzas, aim for a 6-to-9-inch/15-to-23-cm round or rectangle for smaller pizzas and flatbreads, depending on how thick you like your dough. {Don't worry if it's misshapen.} Cover the dough with a towel until baking.
- Generously dust a pizza peel or baking sheet/tray with cornmeal and lay on the dough, shaking the peel or sheet/tray back and forth a little to make sure the dough slides easily.
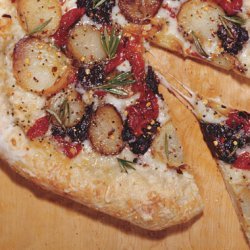
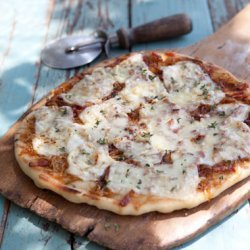
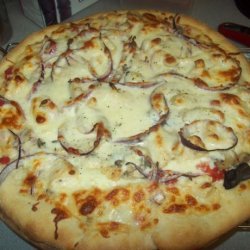
- Chop or slice all the vegetables into small pieces that will cook quickly in the hot oven. Top the pizzas with any topping that needs to be cooked or melted, like cheese, sliced garlic, mushrooms, and small pieces of vegetables that need cooked through{the key is to use a light hand here, since overtopped pizzas tend to turn soggy}, dividing the toppings between all the dough.
- Slide the pizza onto the stone {or cook directly on the baking sheet} and bake larger pizzas one at a time, smaller ones two at a time, until puffed, crisp and evenly baked through, about 8 to 10 minutes.
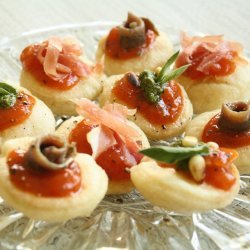
- Remove and top with fresh and raw ingredients like shaved corn, sliced tomatoes, fresh basil, arugula/rocket, or sorrel. Shave or grate fresh Parmigiano-Reggiano over the top, drizzle with your best olive oil, and season with salt and black pepper.
- Get Yeast Smart If you've never worked with yeast before, or if you don't have a thermometer to test the temperature of the water, try this: Dip your finger in the warm water. It should be about slightly warmer than your body temperature, or in other words, about like a very hot bath. To double check your judgment, sprinkle just a few grains of yeast over the water. If they soften and puff into the water, the temperature is likely just right. Add the remaining yeast and set aside until foamy {like shaving cream} and softened, about 5 minutes.
- From The Newlywed Cookbook: Fresh Ideas & Modern Recipes for Cooking with & for Each Other by Sarah Copeland. Text Copyright © 2012 by Sarah Copeland; photographs copyright © 2012 by Sara Remington. Published by Chronicle Books LLC.
Nutrition Facts
| Amount Per 1 Serving | |||
| Calories | 1360.21 Kcal (5695 kJ) | ||
| Calories from fat | 395.44 Kcal | ||
| % Daily Value* | |||
| Total Fat | 43.94g | 68% | |
|---|---|---|---|
| Cholesterol | 61.2mg | 20% | |
| Sodium | 2629.89mg | 110% | |
| Potassium | 401.08mg | 9% | |
| Total Carbs | 171.81g | 57% | |
| Sugars | 1.88g | 8% | |
| Dietary Fiber | 19.58g | 78% | |
| Protein | 69.01g | 138% | |
| Vitamin C | 0.9mg | 2% | |
| Iron | 6.7mg | 37% | |
| Calcium | 1111.9mg | 111% | |
| Amount Per 100 g | |||
| Calories | 267.42 Kcal (1120 kJ) | ||
| Calories from fat | 77.74 Kcal | ||
| % Daily Value* | |||
| Total Fat | 8.64g | 68% | |
|---|---|---|---|
| Cholesterol | 12.03mg | 20% | |
| Sodium | 517.04mg | 110% | |
| Potassium | 78.85mg | 9% | |
| Total Carbs | 33.78g | 57% | |
| Sugars | 0.37g | 8% | |
| Dietary Fiber | 3.85g | 78% | |
| Protein | 13.57g | 138% | |
| Vitamin C | 0.2mg | 2% | |
| Iron | 1.3mg | 37% | |
| Calcium | 218.6mg | 111% | |
* Percent Daily Values are based on a 2000 calorie diet. Your daily values may be higher or lower depending on your calorie needs.
Find out how many calories should you eat.
Try this similar recipes
-
Petite Pizzas
Warm water (110 -115 degrees ), Active dry yeast, Sugar and 11 more.. -
Pepper Cheese Breadsticks (Bread Machine)
Water and 12 more.. -
Cheesy Bread Machine Breadsticks
Water, warm and 11 more.. -
Bill's Braisin Bread
Water, Active dry yeast, White sugar, Bread flour and 2 more.. -
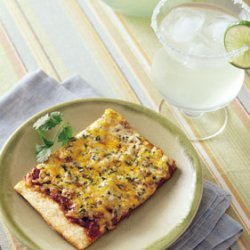
Pizza with Fontina, Potatoes, and Tapenade
Warm water (105of to 115of), Active dry yeast (2 1/4 tsp) and 13 more.. -
Alsatian Pizza with Bacon and Caramelized Onions
Active dry yeast, Sugar and 10 more.. -

Best Ever Pumpernickel Loaf
Warm water, Molasses, Active dry yeast, Canola oil and 7 more.. -
S'kat's Easy Pizza Dough
Water (test on inside of wrist, like for a baby bottle- t... and 6 more.. -
Pizza Stromboli
Active dry yeast, Warm water (110 to 115 ), Honey and 14 more.. -
English Muffins
Water, warmed to 100 f, Active dry yeast, Sugar and 4 more.. -

Pizza Stromboli
Active dry yeast, Warm water (110 to 115 degrees ), Honey and 14 more.. -
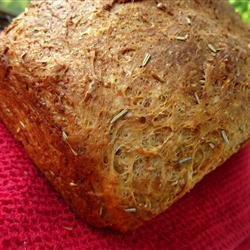
Fresh Rosemary Bread
Active dry yeast, Whole wheat flour, Bread flour, Oat bran and 10 more..
Also Try


Get Your Recipe of Health!
Follow RecipeOfHealth on Facebook!
