
Ingredients:
- 7 batches basic cake recipe
- apricot mousse filling
- 1 (14-inch) cardboard cake round
- 1 (12-inch) cardboard cake round
- 1 (6-inch) cardboard cake round
- plastic straws
Directions:
- To prepare the wedding cake:
- You will need 2 (14-inch) cake layers. Double the Basic Cake Recipe twice which yields 2 (14-inch) cake layers, and follow the cake instructions up until the cake batter is to be baked. Bake the (14-inch) cake layers at 375º, for 10 minutes. Reduce oven temperature to 350º, and bake 28 minutes or until a wooden pick inserted in center comes out clean. Let cool as directed in the recipe.
- You will need 2 (10-inch) cake layers. Double the Basic Cake Recipe once which yields 2 (10-inch) cake layers, and follow the cake instructions up until the cake batter is to be baked. Bake the (10-inch) cake layers at 375º, for 10 minutes. Reduce oven temperature to 350º, and bake 28 minutes or until a wooden pick inserted in center comes out clean. Let cool as directed in the recipe.
- You will need only 1 (6-inch) cake layer. Prepare the Basic Cake Recipe once, which yields 2 (6-inch) cake layers, and follow the cake instructions up until the cake batter is to be baked. Bake the (6-inch) cake layer at 375º for 10 minutes. Reduce oven temperature to 350º, and bake 25 minutes or until a wooden pick inserted in center comes out clean. Let cool as directed in the recipe. (Save the extra (6-inch) layer for another use.)
- To prepare the wedding cake tiers:
- Cover 3 cardboard cake rounds (14, 10, 6 inches in diameter) with aluminum foil. Center the 6-inch round on the 10-inch round and poke a hole through both, using the tip of a knife or an ice pick. Stick the 1/4-inch wooden dowel through both rounds to widen holes.
- Spread a small amount of Buttercream Frosting in the center of the 14-inch cardboard round. Place a 14-inch cake layer on cardboard round. Spread about 1 1/3 cups Apricot Mousse Filling over surface of cake layer, spreading to within 1/2 inch of edge. Top with another 14-inch cake layer. Repeat the procedure with the filling and remaining 14-inch layers, ending with the cake.
- Center the 10-inch cardboard round on top of the 14-inch tier. Using the tip of a sharp knife, trace around the edge of round; set cardboard round aside. Cut 6 plastic straws equal to the height of the tier. Insert straws inside the perimeter of marked circle, spacing straws evenly to support the weight of the other tiers. Spread about 1 1/2 cups frosting on the sides of the tier and about 1 1/3 cups frosting over the top. (This small amount of frosting is just enough to coat the surface of cake, sealing in the crumbs so that the second coat spreads on smoothly.) Carefully wrap the layer with plastic wrap; place the tier in the refrigerator.
- Spread a small amount of Buttercream Frosting in the center of the 10-inch cardboard round. Place a 10-inch cake layer on cardboard round. Spread about 1 1/3 cups Apricot Mousse Filling over surface of cake layer, spreading to within 1/2 inch of edge. Top with another 10-inch cake layer. Repeat the procedure with the filling and remaining 10-inch layers, ending with the cake. Spread 1 1/3 cups frosting on the sides of the tier and a scant 1 cup frosting over the top. Carefully wrap the layer with plastic wrap; place the tier in the refrigerator.
- Spread a small amount of Buttercream Frosting in the center of the 6-inch cardboard round. Place a 6-inch cake layer on cardboard round. Spread about 1/3 cup Apricot Mousse Filling over surface of cake layer, spreading to within 1/2 inch of edge. Top with another 6-inch cake layer. Spread about 3/4 cups frosting on the sides of tier and about 1/3 cup frosting over the top. Carefully wrap the layer with plastic wrap; place the tier in the refrigerator.
- To assemble the wedding cake:
- On the morning of the wedding or one day in advance, center the cake tiers one on top of the other.
- Sharpen one end of a wooden dowel; cut to the height of the cake. Carefully insert the sharpened end through the center of the 6 inch tier, down through the center of the cake, passing through the previously made holes in the cake rounds. (This will keep the cake from sliding sideways during transport.)
- Fit pastry bag with a large coupler and a star tip. Spoon 1 cup frosting into bag; set aside. Spread remaining frosting decoratively over cake. With pastry bag, pipe a border around the bottom of each cake layer.
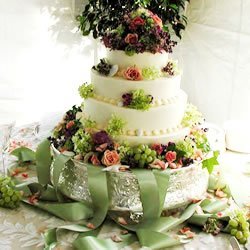
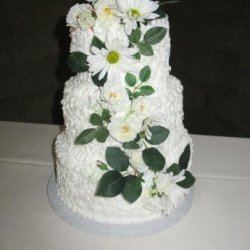
- Decorate the cake with flowers, if desired.
- Note: To prevent the top crust of each cake layer from sticking to the plastic wrap while it's being stored, lightly dust the plastic wrap with flour.
Nutrition Facts
| Amount Per 1 Serving | |||
| Calories | 0 Kcal (0 kJ) | ||
| Calories from fat | 0 Kcal | ||
| % Daily Value* | |||
| Total Fat | 0g | 0% | |
|---|---|---|---|
| Amount Per 100 g | |||
| Calories | 0 Kcal (0 kJ) | ||
| Calories from fat | 0 Kcal | ||
| % Daily Value* | |||
| Total Fat | 0g | 0% | |
|---|---|---|---|
* Percent Daily Values are based on a 2000 calorie diet. Your daily values may be higher or lower depending on your calorie needs.
Find out how many calories should you eat.
Try this similar recipes
-
Cute Hamburger Cupcakes
Dozen white cupcake, Dozen chocolate cupcake and 4 more.. -
Chocolate Buttercream Cherry Candies
Buttercream, Maraschino cherries with stems, well drained and 14 more.. -
Snickers Cake
Recipe whipped buttercream (under my profile on this site) and 4 more.. -
Candied Ginger Pound Cake Truffles
Million dollar lb cake, Vanilla buttercream frosting and 5 more.. -
Chocolate-Mint Cake
Chocolate velvet cake batter and 3 more.. -
Chocolate Velvet Cake With Vanilla Buttercream Frosting
Chocolate velvet cake batter, Vanilla buttercream frosting -
Raspberry Pound Cake Truffles
Million dollar lb cake, Vanilla buttercream frosting and 4 more.. -
Bourbon-Pecan Pound Cake Truffles
Million dollar lb cake, Vanilla buttercream frosting and 4 more.. -
Sunrise Cranberry-orange Muffins
Cake flour, Sugar, Baking powder, Baking soda, Salt and 12 more.. -
Pretty Checkerboard Cake
Yellow cake mix, Milk, Cream cheese, softened, Vanilla and 6 more.. -
Hersheys Collectors Cocoa Cake
Butter or margarine, softened, Sugar, Eggs and 24 more.. -
Banana and Vanilla Cupcakes with Buttercream Frosting
Banana cupcakes, All-purpose flour, Baking powder, Salt and 12 more.. -
Doberge Cake
Cake, Eggs, separated, Cake flour, Baking powder and 27 more.. -
Thiebaud Pink Cake
Fresh strawberries, Water, Sugar, Downy yellow butter cake and 4 more.. -

Chocolate Cake with Vanilla Buttercream
Boiling-hot water, Unsweetened cocoa powder, Whole milk and 10 more.. -
Mini Vanilla Cupcakes
All-purpose flour, Baking powder, Salt, Whole milk and 6 more.. -
Magnolia Bakery Chocolate Cupcakes
All-purpose flour, Baking soda, Unsalted butter, softened and 8 more.. -
Mummys, and Monsters and Spiders, Oh My! Cupcakes
Cupcakes, baked and 2 more..
Also Try
-

-
-
-
Fresh Orange Cupcakes With Orange Icing
Pastry flour, Sugar, Baking powder, Salt, Vegetable oil and 15 more.. -
-
-
-
-
-
Fresh Orange Tart with Hazelnut Crust
Unflavored gelatin, Water, Sugar, Grated orange peel and 12 more..
Get Your Recipe of Health!
Follow RecipeOfHealth on Facebook!
